Introduction to workflows on Iridis 5
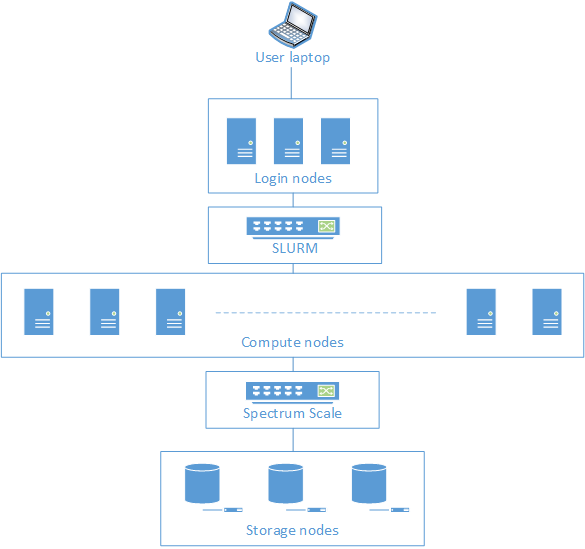
Before starting to work on Iridis, let’s have a quick look at how the cluster is organised:
Anatomy of Iridis 5
-
Login nodes: gateway into the HPC cluster. These are not meant for running computationally intensive tasks. They can however be used for various low CPU intensity task, such as:
Transferring data to and from the cluster.
Installing R packages to a personal library.
Compiling code.
Submitting and monitoring jobs.
Checking job logs.
SLURM scheduler: the login nodes are connected to the Slurm scheduler, which contains scheduling software and a resource manager. Users submit their job with the required resources and SLURM will then allocate the requested resources and execute the users’ jobs.
Compute nodes: a computer server that is allocated to process a computationally intensive task. Compute nodes are organised into a number of partitions, each designed for different types of jobs.
Storage nodes: a computer server that serves I/O request on behalf of the login and compute nodes. This is basically the equivalent of your local hard drive and is where all your data are stored. Storage nodes are connected to all compute nodes through Spectrum Scale which is a cluster file system that provides concurrent access to a single file system or set of file systems from multiple nodes.
When a user connects to Iridis, they connect using the secure shell (SSH) and land on one of the Login nodes.
Once connected, the HPC cluster runs the RedHat Linux operating system so, to communicate with the system we will be using the UNIX shell, a command-line interface.
The primary way we perform work on Iridis 5 is through typing commands in a terminal, much like when we work with R we can type commands directly into the console. You will get to learn a few UNIX and SLURM commands in this workshop, but for a more detailed introduction, I highly recommend the Carpentries materials on: The Unix Shell.
Terminals on UNIX-like machines
On machines running a Linux or mac OS, we can use our local system’s terminal/shell to connect to and send commands to Iridis. However, Rstudio allows to open an additional terminal (separate from the R console), enabling us to interact with the cluster from within the same IDE we will be making changes to our code!
To launch a terminal in Rstudio click: Tools > Terminal > New Terminal
Find out more about the Terminal in Rstudio, especially if you are a Windows user.
Terminals on Windows machines
Windows 7 was the first Windows versions to come with PowerShell installed. It is more of a scripting environment, developed originally just for Windows (although now available cross-platform), but can also be used a command-line for a number UNIX commands compared to the much more limited default Windows shell.
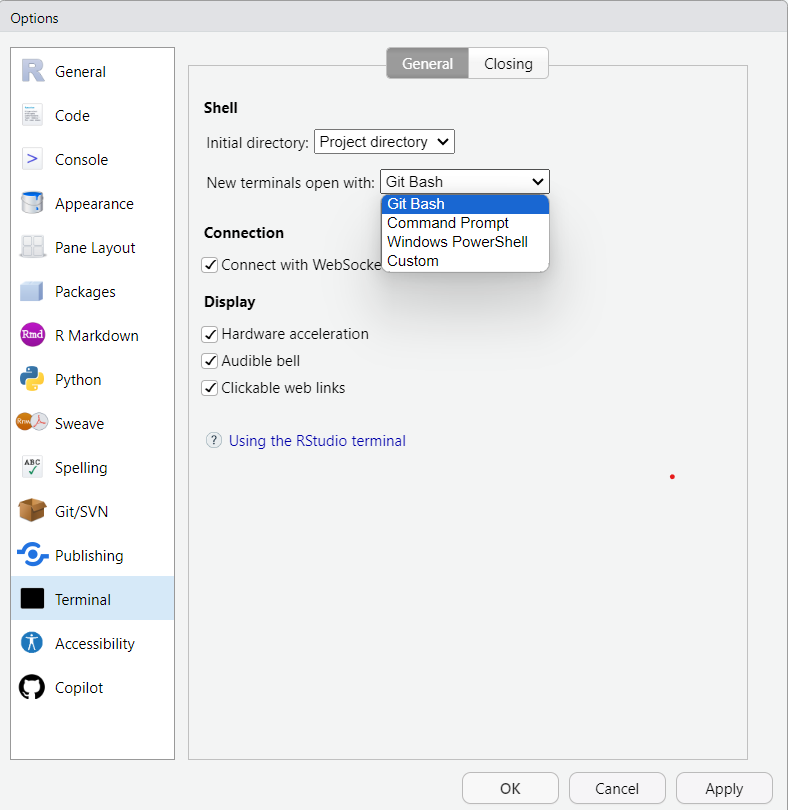
On a Windows machine with Git (and therefore Git Bash installed), Git Bash is also a good option for communicating with Iridis through the terminal.
We can conveniently configure and use the RStudio terminal with either Powershell or Git Bash for a number of UNIX commands, including connecting to Iridis via ssh. However, both Powershell and Git Bash lack the rsync commands we will be using for data transfer so, on a Windows machine, you can launch a local terminal in MobaXterm to use rsync (and any other local command line actions we’ll be performing so feel free to use MobaXterm if you prefer).
To launch a terminal in Rstudio click: Tools > Terminal > New Terminal
To configure the default Terminal to use on Windows click: Tools > Global Options > Terminal
Find out more about the Terminal in Rstudio, especially if you are a Windows user.
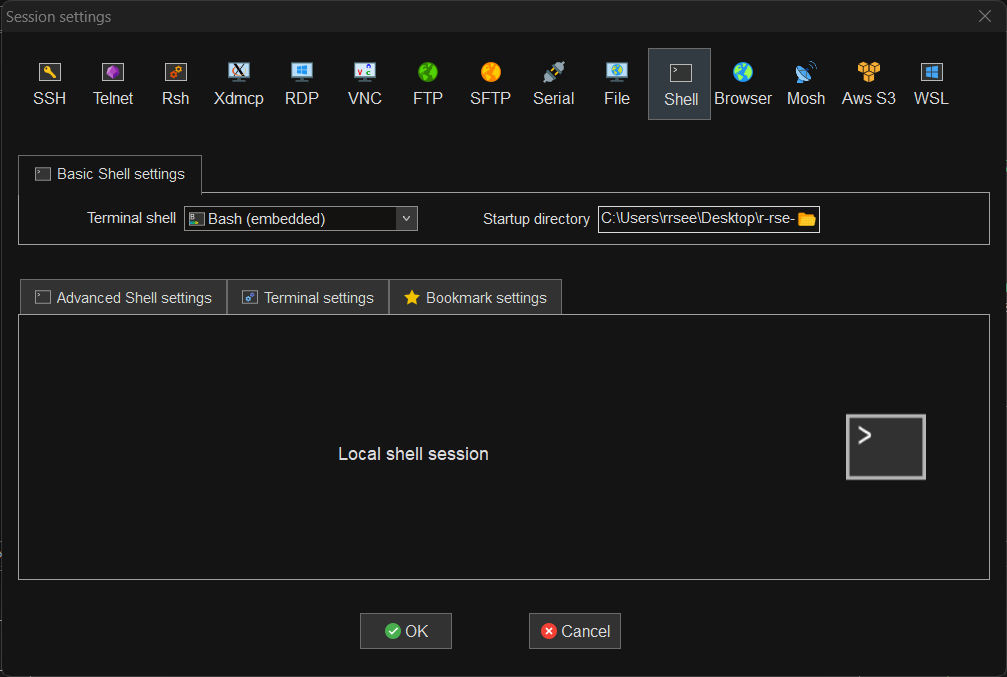
If you’re working on Windows you likely don’t have rsync available (unless you’ve specifically installed it). MobaXterm does however include rsync in it’s local terminal.
To open a new local terminal in MobaXterm (Session > Shell) and set the Startup directory to the r-rse-parallel-r-materials-* directory.
Managing projects for portability
Using Rstudio Projects
I highly recommend the use of self contained Rstudio projects generally but especially with projects which you will also run on the cluster.
Rstudio projects are a convenient way to manage research projects, providing the scaffolding for self contained and portable work. This is especially important when you want to run workflows on multiple machines, whether that’s a home and work computer, a colleague’s computer or an HPC system!
Principles
Everything required to be contained in the project.
Use paths relative to the project root directory.
-
Follow community conventions.
Easier to navigate file system.
Easier to locate materials and trace workflow for you and your collaborators.
Features
Self contained and portable.
Clean environment on load.
Working directory and files tab set to project root.
For more tips and information on Rstudio projects, have a look at the R 4 Data Science (1st Ed) Chapter on projects and the Good Practices for Managing Projects in RStudio Chapter in Introduction to Reproducible Publications with RStudio Carpentries course.
Using here::here() to set paths
One of the biggest barriers to portability are hard coded paths to materials in a project. That’s why using relative paths is such a fundamental principle in making projects portable.
An excellent way to define portable paths is to combine Rstudio projects with package here and function here::here() to create paths programmatically relative to the project root directory.
The benefits of this approach are that they make paths:
- Portable. They are evaluated at run time and resolved relative to the root of the project (not the working directory!)
-
Independent of the where code is evaluated or stored. Because the starting point of
hereis always the Rstudio project root, it doesn’t matter what the actual working directory is when the code is executed, as long as the working directory is somewhere within the project, the paths will always resolve to the same location. Equally, if you move a script that usesherearound within a project,here()will still resolve to the same location. You only have to change the code inhere()if you change the location of the actual file or directory you want it to point to.
Let’s look at an example. If I run:
here::here()in our course materials project, I get:
[1] "/Users/Anna/Desktop/r-rse-parallel-r-materials-02dc656"You, however, will get a different path expanding to the location of the project on your own home directory. This is what we mean by portable. If I gave you a project that uses here to create file paths, they would resolve correctly on your system too.
Let’s also examine how we create paths to files within a project. To create a path to the data directory in the nba directory, we use:
here::here("nba", "data")which on my system resolves to:
[1] "/Users/Anna/Desktop/r-rse-parallel-r-materials-02dc656/nba/data"You can find more information about package here in the package documentation.
Copying materials to Iridis
The first thing we’ll want to do before we can run our workflows on Iridis is transfer all our project files. First we need to make sure we’re connected to Soton VPN.
Your options for transferring files to Iridis 5 are either scp or rsync on the command line or interactively using MobaXterm (See Iridis 5 documentation on Data Transfers for more details). In this workshop, we will be using rsync.
rsync
rsync is an open source utility that provides fast incremental file transfer.
I prefer rsync because of the incremental nature of the software.
If a file you trying to transfer already exists in the destination location and has not changed since the last time you transferred it, rsync will ignore it. That means that, especially the data files which are larger than our scripts and will not change throughout the exercises, will only be transferred once.
If a file has had changes, it will only transfer the changes to this file.
rsync also includes an option to exclude files which can be useful for larger files, secret files or any other file you want to exclude from a data transfer.
rsync basic command
The basic command for transferring files takes the following form:
rsync src_file dst_directory/or
rsync src_directory/ dst_directory/
rsync options
There are a number of additional options we can use to configure the rsync command. See rsync documentation for full details.
For example, the first time we run the command to transfer all our materials, we will use:
rsync -zhav src_directory/ dst_directory/which includes the options zhav where:
-indicates that what follows are optionsztellsrsyncto compress our files. This is useful when working with low bandwidths or larger files (like our.geojsonfile). Beware of the CPU load to compress the files though.hasks for numbers (like times and files sizes) to be printed in a human readable way.aindicates that files should be archived, meaning that most of their characteristics are preserved.vindicates that the command should output a verbose message, useful for monitoring exactly what’s being copied.
rsync file exclusion
rsync also allows us to exclude files or directories when transferring. To exclude a single file, the command takes the form:
rsync --exclude 'file.txt' src_directory/ dst_directory/To exclude a directory, we use:
rsync --exclude 'dir1' src_directory/ dst_directory/To exclude a directory’s contents but not the directory itself we use:
rsync --exclude 'dir1/*' src_directory/ dst_directory/To exclude multiple files/directories, we can use the form:
rsync --exclude={'file1.txt','dir1/*','dir2'} src_directory/ dst_directory/
rsync progress reporting
Another option we can use is progress reporting so we can monitor how our data transfer is progressing.
rsync --progress src_directory/ dst_directory/Transfer workshop materials
Let’s go ahead and put all these options together and transfer our materials to Iridis using the command that follows.
Before running the command, make sure you are working in the root of the course materials project (i.e. the working directory is set to the root of the materials directory) and that you replace userid with your Soton username (there are two replacements you need to make).
Run the following command either in Rstudio terminal on Linux/macOS or in your local shell session on mobaXterm.
rsync -zhav --exclude={'*/outputs/*','.*/'} --progress ./* userid@iridis5.soton.ac.uk:/home/userid/parallel-r-materials/For me, that command is:
rsync -zhav --exclude={'*/outputs/*','.*/'} --progress ./* ak1f23@iridis5.soton.ac.uk:/home/ak1f23/parallel-r-materialsCheck our files on the cluster
Let’s log in to check all files were correctly transferred.
In a macOS or Linux terminal in Rstudio, type:
ssh userid@iridis5.soton.ac.ukor
ssh iridisif you’ve created and configured your ~/.ssh/.config/ as per the course set up instructions.
On Windows, launch a session on Iridis through MobaXterm.
Once connected, let’s use command ls to list files in our our home directory.
lsls with no additional arguments lists the contents of the current working directory (same as if we run ls .).
We should see a directory called parallel-r-materials
We can list the contents of that directory by using:
ls -l parallel-r-materialsNote we’re adding the option -l which creates a long listing format with additional details.
Install packages into a personal library
While IT services maintain a list of installed packages in the root user R library on Iridis, you may sometimes want to install additional packages or even the latest versions of packages.
To do so you will need to create a personal library of packages in your home directory.
Running R interactively on Iridis 5
The first time you install a package you will need to do so interactively (i.e. by launching R on Iridis) so as to authorise the creation of your personal library.
This is not as straight forward as on your local system as you will need to load both R and any additional modules (external libraries) that packages being installed might require.
This can be hard to do on Iridis, especially with packages that require compilation or multiple external libraries. If you get stuck, it might be easier to check whether the package is already installed in the central library. Otherwise you might need to get in touch with IT support if you can’t troubleshoot any failures to install.
You can find information required external libraries or compilation on the front page of any CRAN package documentation.
For example, on the sf package CRAN page, it lists:
NeedsCompilation:   yes
SystemRequirements: GDAL (>= 2.0.1), GEOS (>= 3.4.0), PROJ (>= 4.8.0), sqlite3
One of the packages we’ll be using (sf) requires that geospatial libraries GDAL, PROJ and GEOS are loaded when the package is being installed while dependencies of another package (ggpubr), require cmake to build.
Load modules
To load software in our working environment on Iridis, we use the module load command followed by the library/software we wish to load.
module load gdal/3.0.1
module load proj/6.1.1
module load geos/3.6.2
module load R/4.4.1-gcc
module load cmake
Launch R
Next, let’s launch R in interactive mode:
RYou should see the very familiar R start up message. The terminal is now an R console, ready for us to type R commands!
Install packages
To install the required packages for our workflows, run the following R expression in the console:
install.packages("pak")

pkgs <- c(
  "assertr",
  "cli",
  "colorspace",
  "dplyr",
  "fs",
  "furrr",
  "future",
  "future.apply",
  "future.batchtools",
  "ggplot2",
  "ggpubr",
  "glue",
  "here",
  "janitor",
  "purrr",
  "readr",
  "sf",
  "tictoc"
)
pak::pak(pkgs)
The first time you run this, you will be asked whether you want to create a personal library. Enter y and then y when prompted to confirm it’s location:
Warning in install.packages(c("assertr", "cli", "colorspace", "dplyr", "fs",  :
  'lib = "/mainfs/local/software/R/4.4.1/build-gcc/lib64/R/library"' is not writable
Would you like to use a personal library instead? (yes/No/cancel) y

Would you like to create a personal library
'/mainfs/home/ak1f23/R/x86_64-pc-linux-gnu-library/4.4' y
You’ll then be asked to select a CRAN mirror, I chose Bristol, 68.
The packages will then start installing. This should take a bit of time but will hopefully not result in any errors!
Quit R
Once installation completes, we can quit R with:
quit()We are now back in the command line.
Check library
If we run:
lswe should now find an R/ directory in our home directory. This is our personal library where any packages we install are stored.
For more robust reproducibility consider using package renv to create per project libraries of specific versions of packages.


