pkgs <- c(
  "assertr",
  "bench",
  "benchmarkme",
  "biglm",
  "cli",
  "colorspace",
  "doFuture",
  "dplyr",
  "foreach",
  "fs",
  "furrr",
  "future",
  "future.apply",
  "future.batchtools",
  "ggplot2",
  "ggpubr",
  "glue",
  "here",
  "janitor",
  "microbenchmark",
  "purrr",
  "R.utils",
  "readr",
  "sf",
  "tibble",
  "tictoc",
  "usethis"
)
install.packages(pkgs)Setup Instructions
Install a recent R version
You can download the latest version of R from https://www.r-project.org/.
Ideally you should have an R version > 4.0.0. Otherwise you might experience issues with using/installing some of the packages needed.
For Windows, where you are presented with a number of binaries, just install base, which should be all you will need to complete the course on Windows.
Install RStudio
Install Rstudio desktop from https://posit.co/download/rstudio-desktop/
Install R dependencies
Once you’ve installed R & Rstudio, open Rstudio and use the following code to install the packages we will be working with in one go.
Download course materials
The course materials can be found at https://github.com/r-rse/parallel-r-materials.
To download the materials you can use usethis function use_course(). This will download a zip file of the repository and unzip it for you. If you do not supply a destdir path, as below, it will ask you whether you want it to download it to your Desktop by default. If you prefer it to be downloaded to another destination, just supply a path to destdir.
usethis::use_course("r-rse/parallel-r-materials")This will download the materials and open the project in a new Rstudio session.
Next you’ll need to unzip the larger zipped geojson file with function gunzip() from package R.utils.
Make sure the project is launched in RStudio, you are working within it and the working directory is set to the root of the parallel-r-materials project, otherwise, change the path to point to the health_data/data/ directory in the course materials project you just downloaded.
R.utils::gunzip("health_data/data/lsoa_boundaries.geojson.gz")WINDOWS ONLY - Install MobaXterm
MobaXterm is a toolbox for remote computing on Windows. In a single application, it provides all the important remote network tools (SSH, RDP, X11, SFTP, FTP, Telnet, Rlogin, …) to Windows desktop.
It also features a great terminal emulator based on the efficient PuTTY program (by Simon Tatham). This terminal allows you to run remote commands through SSH, telnet, rlogin or serial connections, but also to run Unix commands on your local Windows computer thanks to the use of dedicated plugins. There are many Unix commands which can be used inside the local terminal when using the “CygUtils” or other dedicated plugins: ssh, telnet, rlogin, rsh, rsync, wget, vim, corkscrew, httping, fdupes, iperf, mathomatic, xhost, xprop, xdpyinfo, xmodmap, xkill, Xorg…
See Additional notes on required software on Windows for more details on Terminals on Windows.
Note that the PuTTY emulator used by MobaXterm does not recognise CTRL+C or CTRL+V for copying and pasting! Copying and pasting is instead exclusively click based (left & right respectively). Please consult the official PuTTY documentation for more details.
You can install the latest version of MobaXterm here: https://mobaxterm.mobatek.net/
For installation instructions and a demonstration of connecting to Iridis 5, see the University of Southampton Tutorial on MobaXterm.
Setup for Working on Iridis 5
Please ensure you have completed all setup required to work on Iridis 5.
Full instructions can be found on the HPC Sharepoint, specifically and Connecting to Iridis 5
Creating SSH Keys to connect to Iridis 5.
SSH key set up instructions on masOS & Linux
Can also be run on Windows through PowerShell or Git Bash.
See Additional notes on required software on Windows for more details on Powershell and Git Bash.
I’ve added more detailed step by step instructions for setting up SSH keys through the command line (terminal) on your system. If you are on Windows, you might prefer to follow the instructions to complete set up through MobaXterm Graphical User Interface but can follow these steps through Powershell or Git Bash (including through an appropriately configured Rstudio Terminal).
Create SSH key pair with ssh-keygen on your local computer
To create an ed25519 type SSH key pair with the name id_iridis_ed25519 and a high key derivation function (100, for better resistance to brute force cracking) we use the following ssh-keygen command:
ssh-keygen -t ed25519 -a 100 -f ~/.ssh/id_iridis_ed25519It is highly advisable to add an extra layer of security and add a passphrase to your key-pair. Make sure to keep that safe, as any password, and don’t forget it/store it somewhere safe!
Let’s also ensure your files are protected by the appropriate permissions. We can check permission by using ls -l ~/.ssh/. This command list all files in the ~/.ssh/ directory as well as their permissions indicated by the contents of the first column. r, w, and x stands for read, write, and executable permissions.
-
The
~/.sshdirectory itself should be readable/writable/executable only by yourself (drwx------, chmod code 700).chmod 700 ~/.ssh -
Your private key should be readable/writable only by yourself (
rw-------, chmod code 600).chmod 600 ~/.ssh/id_iridis_ed25519 -
Your public key should be writable only by yourself but can be read by others. (
rw-r--r--, chmod code 600).chmod 644 ~/.ssh/id_iridis_ed25519.pub
Copy public key to Iridis
Now, to be able to your our key-pair to access Iridis 5, we need to copy the public key in our home directory to an .ssh/ directory, on Iridis.
Make sure you copy the PUBLIC key ONLY! Never copy your private key to Iridis.
There’s a handy command for that, where userid should be your soton username:
ssh-copy-id -i ~/.ssh/id_iridis_ed25519.pub userid@iridis5.soton.ac.ukThis creates an .ssh/ directory in your home directory on Iridis (if it doesn’t exist already) and adds your public key to the ~/.ssh/authorized_keys file.
Test login with SSH key pair works
Next, let’s test out whether everything worked and we can access the cluster without providing a password. To complete this process, you will be asked for your soton password the first time you log on as well as your key pair passphrase.
Use the following command to access the cluster, substituting userid with your soton username.
ssh -i ~/.ssh/id_iridis_ed25519 userid@iridis5.soton.ac.ukYou will be asked to provide the passphrase for your key-pair. This will be stored in the keychain and will not required again.
Once you are happy you can log on, exit the cluster with:
exitSet up an ~/.ssh/config file for easier access
To enable quicker log in to the cluster, you can create a ~/.ssh/config file and store configurations for logging in when using the ssh command.
First you need to create the config file and set the appropriate permissions:
touch ~/.ssh/config
chmod 600 ~/.ssh/config
Next, you want to open the config file in your favourite text editor (See instructions for seeing hidden files and directories on Windows, macOS and Linux).
Paste the following to your ~/.ssh/config file, substituting userid with your soton username.
Host iridis
    HostName iridis5.soton.ac.uk
    User userid
    IdentityFile ~/.ssh/id_iridis_ed25519
    AddKeysToAgent yes
Save the file.
Access Iridis 5 Using stored configurations
Now that you have set up your access configuration in your ~/.ssh/config, you only need to provide the name of the configuration (i.e. iridis) to the ssh command.
The command takes all required information for login in from your config file!
Note: you might have to provide the passphrase for you key again the first time you use the command
ssh iridisMuch simpler! 🎉
SSH key set up instructions on Windows
To set up SSH keys on a Windows machine, you can use MobaXterm and follow the instructions on the University of Southampton HPC sharepoint on Creating SSH keys on Windows.
Please also check you can successfully connect using MobaXterm and your newly created keys by following the instructions on Connecting to Iridis 5.
For installation instructions and a demonstration of connecting to Iridis 5, see the University of Southampton Tutorial on First connection using MobaXterm.
Additional notes on required software on Windows
To communicate with Iridis we need to use the UNIX shell, a command-line interface / terminal (text based) application.
While Linux and mac OS machines are UNIX-like and come with UNIX shell applications as standard (which can also be accessed through an Rstudio Terminal) Windows machines have different applications with differing capabilities and available commands and it’s good to be familiar with them.
Terminals on Windows machines
Windows 7 was the first Windows versions to come with PowerShell installed. It is more of a scripting environment, developed originally just for Windows (although now available cross-platform), but can also be used a command-line for a number UNIX commands compared to the much more limited default Windows shell.
On a Windows machine with Git (and therefore Git Bash installed), Git Bash is also a good option for basic communication with Iridis through the terminal in Rstudio. You can install Git for Windows here.
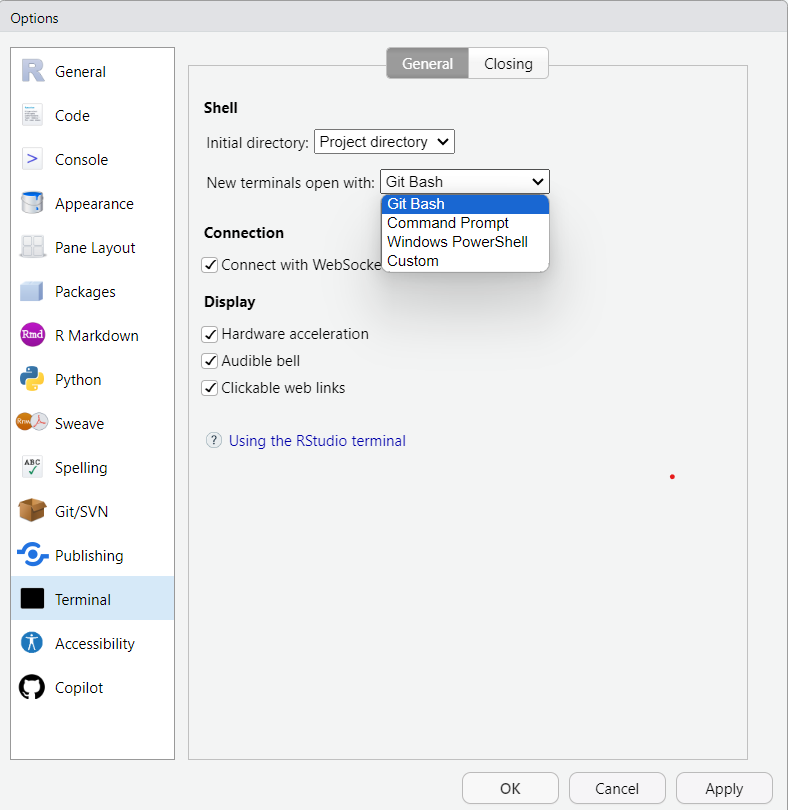
We can conveniently configure and use the RStudio terminal with either Powershell or Git Bash for a number of UNIX commands, including connecting to Iridis via ssh.
To launch a terminal in Rstudio click: Tools > Terminal > New Terminal
To configure the default Terminal to use on Windows click: Tools > Global Options > Terminal
Find out more about the Terminal in Rstudio, especially if you are a Windows user.
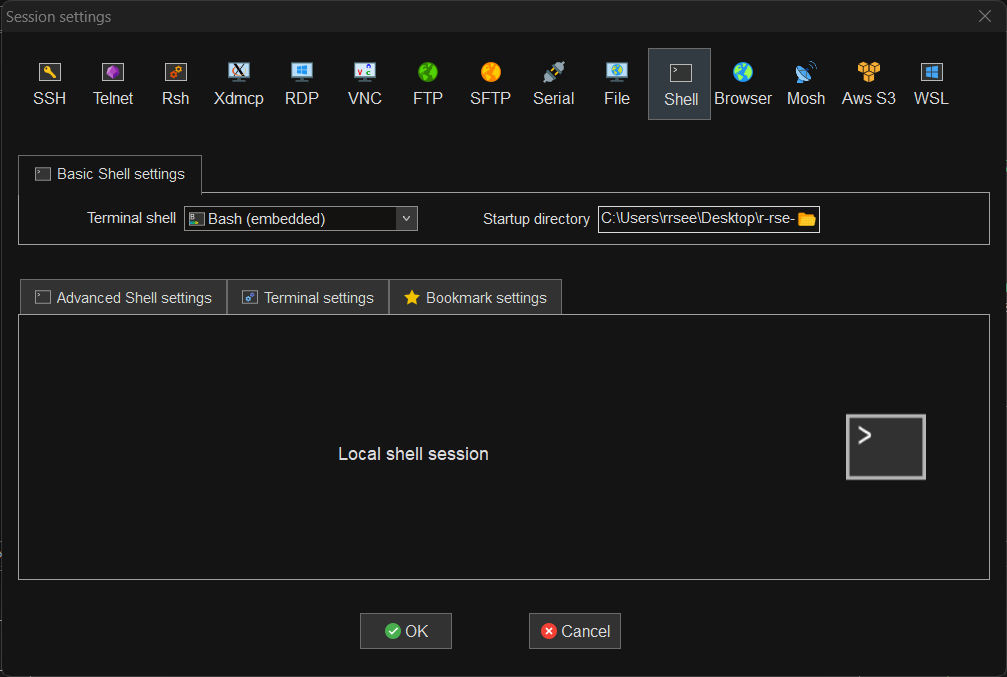
However, both Powershell and Git Bash lack the rsync commands we will be using for data transfer so, on a Windows machine, you can launch a local terminal in MobaXterm to use rsync (and any other local command line actions we’ll be performing so feel free to use MobaXterm if you prefer).
If you’re working on Windows you likely don’t have rsync available (unless you’ve specifically installed it). MobaXterm does however include rsync in it’s local terminal.
To open a new local terminal in MobaXterm (Session > Shell) and set the Startup directory to the r-rse-parallel-r-materials-* directory.

